> For the complete documentation index, see [llms.txt](https://docs.carto.com/llms.txt). Markdown versions of documentation pages are available by appending `.md` to page URLs; this page is available as [Markdown](https://docs.carto.com/carto-self-hosted/deployment/single-vm-deployment.md).
# Single Virtual Machine deployment
Deploy CARTO Self-hosted using a Virtual Machine, k0s, and Kots
{% hint style="info" %}
**Estimated time:** Completing this deployment guide is expected to take approximately **2 hours**. This estimate may vary based on individual familiarity with the technology stack involved and the complexity of your organization's environment.
{% endhint %}
{% hint style="info" %}
This guide covers GCP, AWS, and Azure. Where steps differ by provider, choose your cloud provider in the tabs within that step — GitBook keeps the same provider selected across the rest of the page.
{% endhint %}
## Goals and scope of this article
The goal of this article is to guide system administrators through the complete deployment of CARTO Self-Hosted using a Single Virtual Machine in a cloud environment such as GCP, AWS, or Azure. The scope includes all necessary steps and requirements to prepare the environment, install and configure the CARTO platform, connect it to an external PostgreSQL metadata database, enable secure HTTPS access with a valid domain and SSL certificate, set up cloud storage integration, and verify the deployment through post-installation checks.
## Requirements
{% hint style="warning" %}
**Complete all prerequisites before starting.** Each item below links to its dedicated setup guide. Do not start the installation steps until every box is checked.
* [ ] **License & customer package** (including `license.yaml`) received from CARTO Support → [License / Customer Package](/carto-self-hosted/planning/prerequisites/license.md)
* [ ] **Virtual machine** provisioned and meets the hardware requirements for Single VM deployments → [Hardware & Software Requirements](/carto-self-hosted/planning/prerequisites/hardware-requirements.md)
* [ ] **Metadata database** (PostgreSQL 14+) provisioned and accessible from the VM → [Metadata Database prerequisites](/carto-self-hosted/planning/prerequisites/metadata-database.md)
* [ ] **Object storage buckets** created, CORS configured, and permissions set → [Object Storage prerequisites](/carto-self-hosted/planning/prerequisites/object-storage.md)
* [ ] **Network egress** open for all required CARTO services → [Network egress requirements](/carto-self-hosted/planning/prerequisites/network/egress.md)
{% endhint %}
To deploy CARTO Self-Hosted based on a Single VM deployment, you need:
* Access to the CARTO Self-Hosted installation package, including your license file. If you haven’t received it, you can request it by contacting .
* A domain name that you own and can configure with custom DNS records.
* An SSL/TLS certificate for your domain, as CARTO must be accessed over HTTPS.
* A virtual machine that meets the minimum [hardware requirements and dependencies](/carto-self-hosted/planning/prerequisites/hardware-requirements.md) required for Single VM deployments.
* A review and understanding of the [Configure your own Buckets](/carto-self-hosted/configuration/data-and-storage/configure-your-own-buckets.md) requirements to configure external cloud storage.
* Familiarity as a SysAdmin in the cloud environment where you are running your installation: GCP, AWS, or Azure.
## Create a Linux VM instance
CARTO Self-Hosted can be deployed in any Virtual Machine that meets the minimum requirements specified for [Single VM deployments](/carto-self-hosted/planning/prerequisites/hardware-requirements.md).
{% tabs %}
{% tab title="Google Cloud" %}
Create a new Linux VM in the [Google Cloud console](https://console.cloud.google.com/) that meets the minimum requirements specified at [Single VM deployments](/carto-self-hosted/planning/prerequisites/hardware-requirements.md).
Refer to the [Google Cloud documentation](https://cloud.google.com/compute/docs/instances/create-start-instance) to learn how to create a new virtual machine.
* Configure the firewall to allow HTTPS traffic.
* Specify **SSD persistent** with a size that meets or exceeds the minimum requirements.
{% endtab %}
{% tab title="AWS" %}
Create a new Linux EC2 instance in the [Amazon EC2 console](https://console.aws.amazon.com/ec2/) using the Ubuntu Server 22.04 LTS (x86) Amazon Machine Image (AMI).
Refer to the [Amazon EC2 documentation](https://docs.aws.amazon.com/AWSEC2/latest/UserGuide/EC2_GetStarted.html) to learn how to create a new virtual machine.
* Configure the firewall to allow HTTPS traffic.
* Specify **SSD persistent** with a size that meets or exceeds the minimum requirements.
{% endtab %}
{% tab title="Azure" %}
Create a new Linux VM in the [Azure Portal](https://portal.azure.com/) that meets the minimum requirements.
Refer to the [Azure documentation](https://learn.microsoft.com/en-us/azure/virtual-machines/linux/quick-create-portal?tabs=ubuntu) to learn how to create a new virtual machine.
* Configure the firewall to allow HTTPS traffic.
* When creating the VM, use SSH public key authentication and provide a username. Generate a new key-pair and specify a name. Azure generates and stores the key in the Azure KeyVault to download later.
* Specify **SSD persistent** with a size that meets or exceeds the minimum requirements.
* Once the VM is initialized, download the private key when prompted. Update the permissions of the key-pair to ensure it has the required permissions for your SSH client.
```bash
chmod 400
ssh -i @
```
Ensure **Delete public IP and NIC when VM is deleted** is enabled.
{% endtab %}
{% endtabs %}
## Installation steps
### Install Admin Console
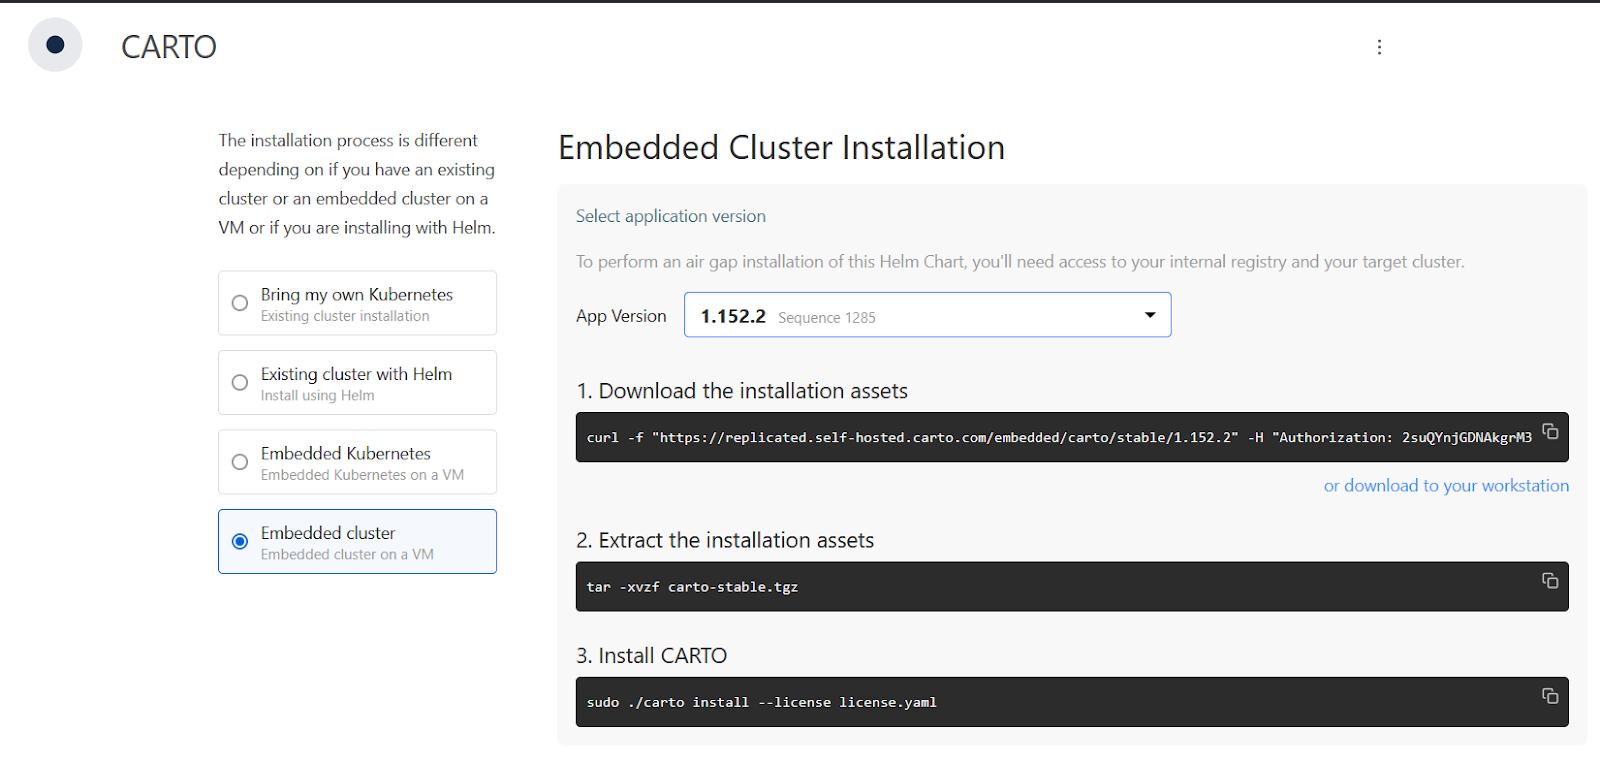
Download the customer package from the URL that shared by CARTO team. **Select the CARTO Embedded Cluster installation** and download the binary.
Extract the package content using the following command:
```
tar -xvf carto.tgz
```
Check that your machine meets the [deployment requirements](/carto-self-hosted/planning/prerequisites.md) and install the CARTO Self-Hosted platform Admin Console with the following command:
```
sudo ./carto install --license license.yaml
```
During the installation process of CARTO Self-Hosted, you will be prompted to set a password for accessing the Admin Console. This console serves as the control center for managing various deployment options related to your CARTO instance. **It is crucial to securely store this password for future access** and administration tasks.
Upon completion of the installation, you can access the Admin Console through your server's IP address and port 30000 by navigating to [`http://your-server-ip:30000`](http://your-server-ip:30000/).
```bash
sudo ./carto install --license license.yaml
? Enter a new Admin Console password: ********
? Confirm password: ********
✔ Node installation finished
✔ Storage is ready!
✔ Embedded Cluster Operator is ready!
✔ Admin Console is ready!
Admin Console accessible at: http://your_ip:30000
```
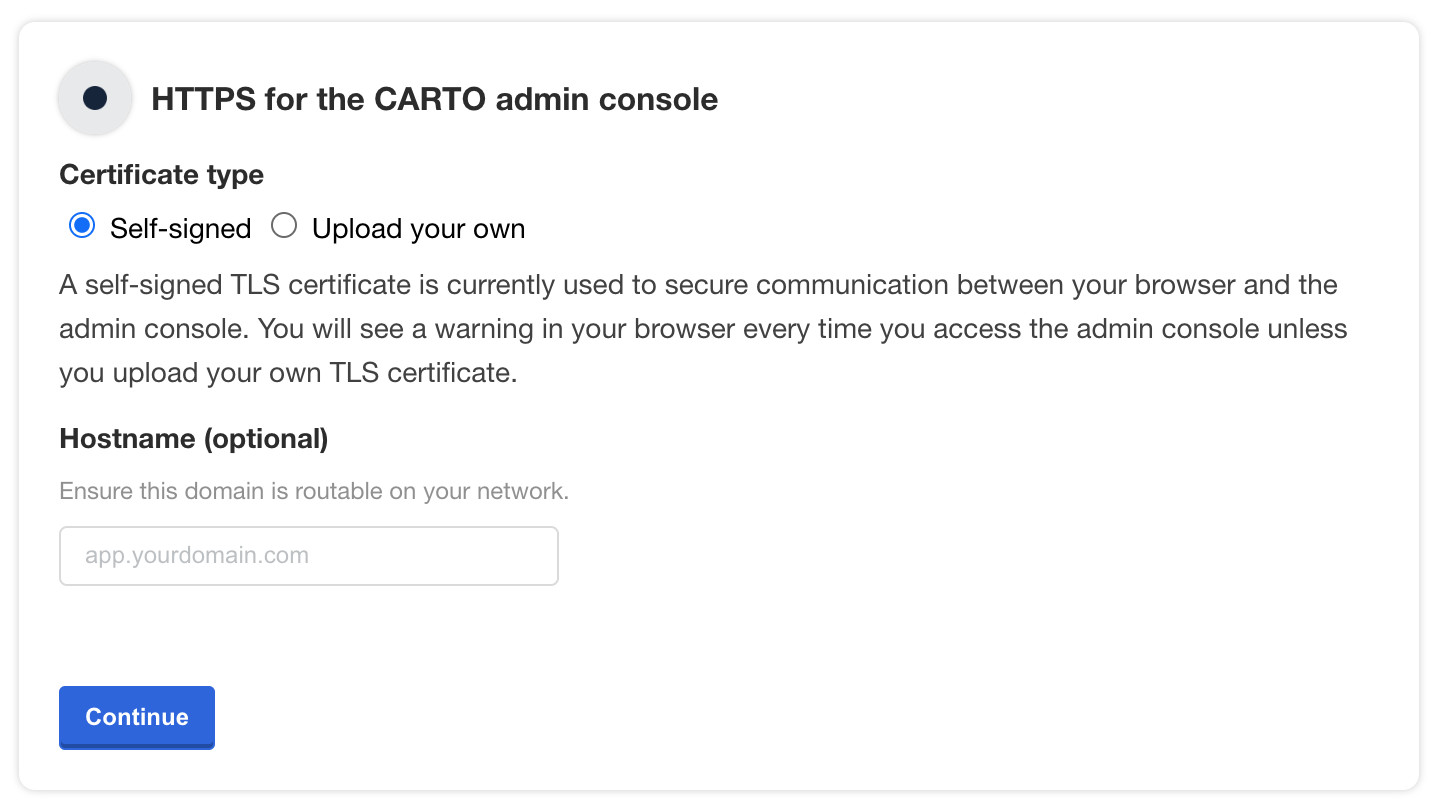
After accessing the URL, you'll need to configure an SSL certificate for the Admin Console.
Once the SSL certificate is configured, proceed by clicking the continue button to confirm the configuration of your cluster. You can then begin customizing the settings and features of your CARTO Self-Hosted platform through the Admin Console.
### Metadata database
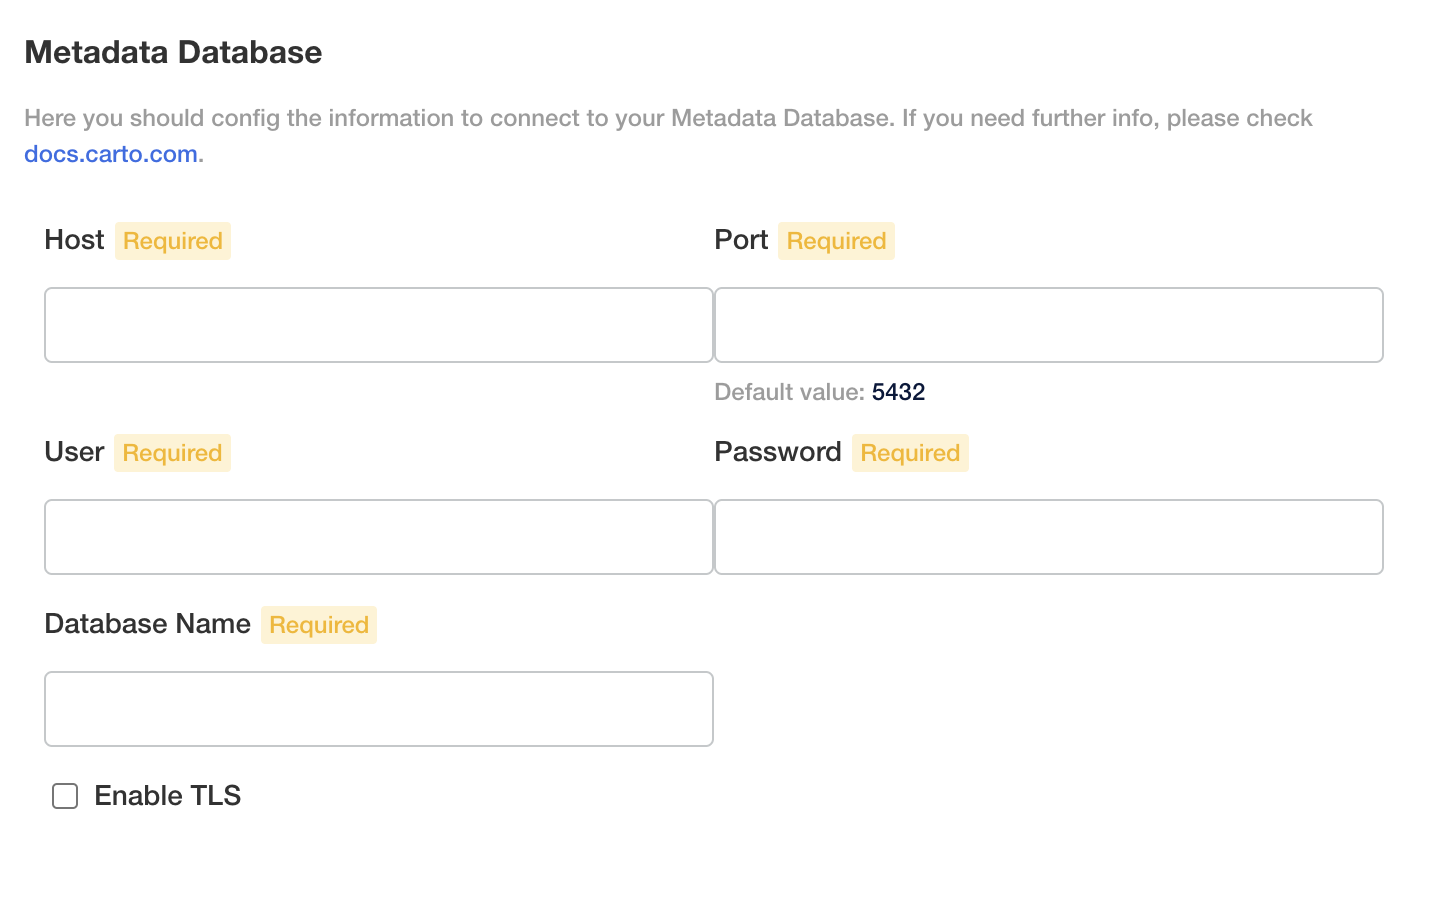
At this point, we are setting up the configuration of the [external database](/carto-self-hosted/planning/prerequisites/metadata-database.md). You need to provide a PostgreSQL user and a database that can be used by that user to configure the metadata database used by CARTO platform.
If you already have a PostgreSQL deployment that can be used by your CARTO Self-Hosted platform, you'll have to [create a new database](https://www.postgresql.org/docs/current/manage-ag-createdb.html) for CARTO platform and a user with enough permissions to use that database.
In order to enable TLS connections, you'll also have to provide the SSL certificate of your PostgreSQL database.
{% hint style="danger" %}
Mutual TLS connections between the external database and the APIs are not supported, so client certificates can't be configured on your external database
{% endhint %}
{% hint style="warning" %}
**Azure PostgreSQL Flexible Server**:
* Make sure you add ownership over the carto database and all privileges over the schema.
* Extensions must be allowlisted before creation. Run `az postgres flexible-server parameter set --name azure.extensions --value "pgcrypto"` then create the extension as the admin user. See [Azure docs](https://go.microsoft.com/fwlink/?linkid=2301063).
{% endhint %}
### Access to CARTO
{% hint style="info" %}
For production load balancer architectures and TLS best practices when placing a reverse proxy or LB in front of your Single VM, see [Load balancing best practices](/carto-self-hosted/best-practices/deployment/load-balancing-best-practices.md).
{% endhint %}
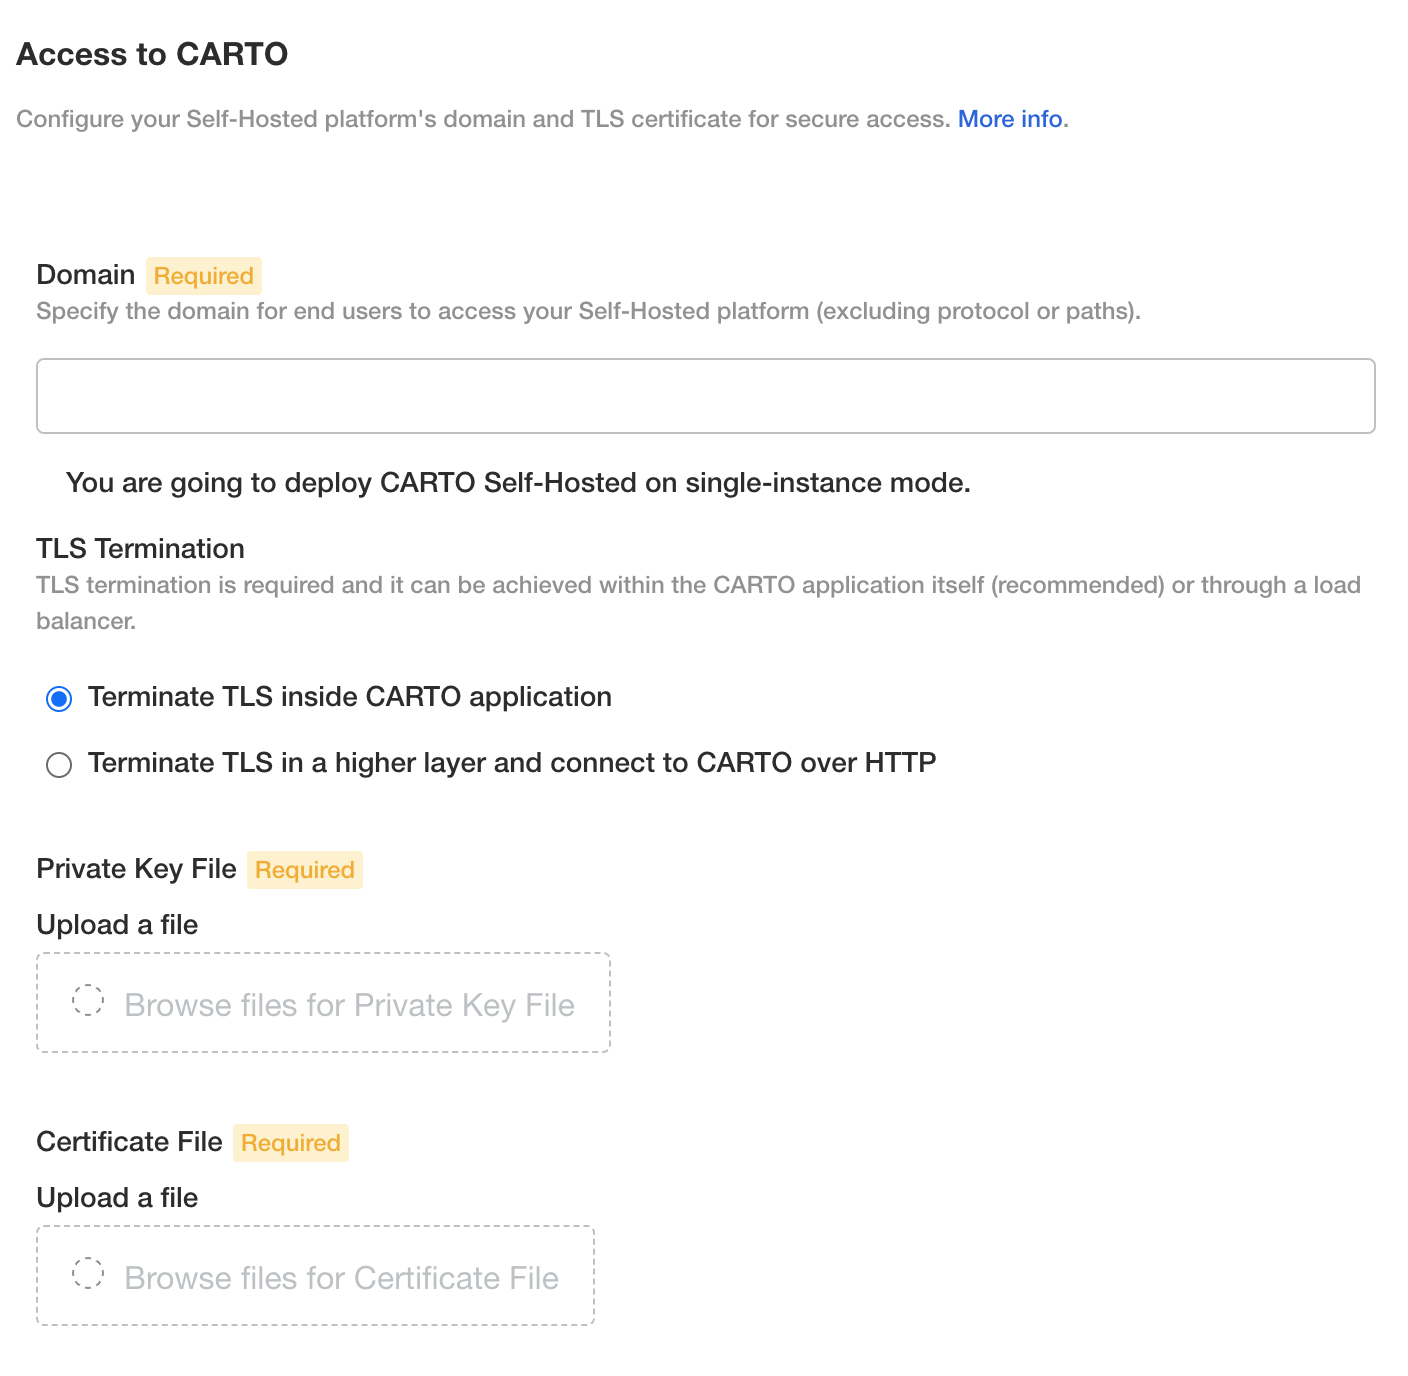
In order to access CARTO Self-Hosted platform, you'll need a domain pointing to the IP address of the machine where you're deploying the platform. This domain has to be defined in the following section of the configuration:
{% hint style="info" %}
A full domain is required. You cannot install CARTO in a domain path like
{% endhint %}
The CARTO platform necessitates a valid SSL certificate tailored to your domain to ensure secure communication and data transfer. Depending on your architecture, you have the flexibility to either terminate TLS within the CARTO application, requiring your SSL certificate, or at a higher layer.
A valid certificate contains:
* A `.crt` file with your custom domain x509 certificate.
* A `.key` file with your custom domain private key.
{% hint style="info" %}
If your TLS certificate key is protected with a passphrase the CARTO Self-hosted installation won't be able to work as expected. You can easily generate a new key file without passphrase protection using the following command:
```bash
openssl rsa -in keyfile_with_passphrase.key -out new_keyfile.key
```
{% endhint %}
Once the configuration has been updated, you'll need a DNS record that points my.domain.com to the **External IP** of your VM. For debugging purposes, you might want to modify your /etc/hosts:
```
echo "34.172.214.74 my.domain.com" >> /etc/hosts
```
### Cloud Storage
CARTO Self-hosted platform requires access to some storage buckets to save some resources required by the platform. These buckets are in charge of storing assets such as imported datasets, map snapshots and custom markers.
You can create and use your own storage buckets in any of the following supported storage providers:
* [Google Cloud Storage](https://cloud.google.com/storage)
* [AWS S3](https://aws.amazon.com/s3/)
* [Azure Blob Storage](https://azure.microsoft.com/es-es/products/storage/blobs/)
And in order to configure them, there is a [detailed guide](/carto-self-hosted/configuration/data-and-storage/configure-your-own-buckets.md) available that you should follow to complete the Self-Hosted configuration process.
### Deploy CARTO Self-Hosted platform
After finalizing your configuration, proceed by clicking the “Continue” button, which will direct you to the Dashboard of your CARTO Admin Console. Here, you'll observe a series of checks being performed to verify the readiness of your environment for hosting the CARTO platform.
It's essential to review the results of these checks to identify any failures. If all checks pass successfully, you can proceed by clicking the “Deploy” button to initiate the installation process of your Self-Hosted platform. Please, note that deployment completion may take a few minutes.
## Post-installation checks
In order to verify CARTO Self Hosted was correctly installed, and it's functional, we recommend performing the following checks:
1. Sign in to your Self Hosted, create a user and a new organization.
2. Go to the `Connections` page, in the left-hand menu, create a new connection to one of the available providers.
3. Go to the `Data Explorer` page, click on the `Upload` button right next to the `Connections` panel. Import a dataset from a local file.
4. Go back to the `Maps` page, and create a new map.
5. In this new map, add a new layer from a table using the connection created in step 3.
6. Create a new layer from a SQL Query to the same table. You can use a simple query like:
```
SELECT * FROM LIMIT 100;
```
7. Create a new layer from the dataset imported in step 4.
8. Make the map public, copy the sharing URL, and open it in a new incognito window.
9. Go back to the `Maps` page, and verify your map appears there, and the map thumbnail represents the latest changes you made to the map.
**Congrats**! Once you've configured your custom buckets, you should have a production-ready deployment of CARTO Self-Hosted at `https://my.domain.com`
{% hint style="info" %}
You may notice that the **onboarding experience** (demo maps, demo workflows...) and the **Data Observatory-automated features** (subscriptions, enrichment...) are disabled by default in your new organization, because the CARTO Data Warehouse is not enabled.
If you'd like to enable the onboarding experience and the Data Observatory features, follow the [guide to enable the CARTO Data Warehouse](/carto-self-hosted/configuration/data-and-storage/enable-the-carto-data-warehouse.md) or contact .
If you prefer not to enable the CARTO Data Warehouse, you can still use the Data Observatory without the UI features: after getting in touch, our team can deliver the data (both premium and public subscriptions) manually to your data warehouse.
{% endhint %}
## Analytics Toolbox in CARTO Self-Hosted
To fully leverage CARTO's capabilities, you need to gain access to the Analytics Toolbox functions. This step is crucial to fully leverage CARTO's capabilities. Please refer to the documentation of your data warehouse provider for detailed instructions:
* [Google BigQuery](/data-and-analysis/analytics-toolbox-for-bigquery/getting-access.md)
* [Amazon Redshift](/data-and-analysis/analytics-toolbox-for-redshift/getting-access.md)
* [Snowflake](https://docs.carto.com/data-and-analysis/analytics-toolbox-for-snowflake/getting-access)
* [Databricks](/data-and-analysis/analytics-toolbox-for-databricks.md)
* [PostgreSQL](https://docs.carto.com/data-and-analysis/analytics-toolbox-for-postgresql/getting-access)
## Verify your deployment
Run these checks after completing the installation to confirm your CARTO Self-Hosted instance is healthy.
### Quick checks (first success)
* [ ] The CARTO application is reachable at your configured domain over HTTPS
* [ ] You can log in with your admin credentials
* [ ] A basic map renders successfully
* [ ] The connection to your data warehouse is working
### Infrastructure checks
* [ ] All CARTO services are running (check via the Admin Console status page)
* [ ] Your SSL/TLS certificate is valid and not expired
* [ ] Cloud storage buckets are accessible from the VM
### Acceptance checklist
* [ ] License is correctly applied (visible in Admin Console)
* [ ] Users can be invited and can log in
* [ ] At least one data warehouse connection is configured and healthy
* [ ] Object storage (blob buckets) is accessible and writable
## Troubleshooting
From the Admin Console, open the **Troubleshoot** tab and click **Analyze CARTO** to generate a support bundle, which collects the information needed to check the status of your deployment. For when and how to generate it for CARTO Support, see [Get debug information for support](https://docs.carto.com/carto-self-hosted/deployment/pages/j6DtznSKpAg8mYs8WqPE#id-3.-obtain-support-bundle).
For further assistance, check our [Support](/carto-self-hosted/operations/troubleshooting/support.md) page.
---
# Agent Instructions
This documentation is published with GitBook. GitBook is the documentation platform designed so that both humans and AI agents can read, navigate, and reason over technical content effectively. Learn more at gitbook.com.
## Querying This Documentation
If you need additional information that is not directly available in this page, you can query the documentation by asking a question.
Perform an HTTP GET request on the following URL with the `ask` and `goal` query parameters:
```
GET https://docs.carto.com/carto-self-hosted/deployment/single-vm-deployment.md?ask=&goal=
```
`ask` is the immediate question: it should be specific, self-contained, and written in natural language.
`goal` is what the user is ultimately trying to achieve, the reason they need the answer. Sharing it helps GitBook give you a better, more relevant answer. A goal is most helpful when it describes the outcome the user wants rather than restating the question. For example, with `ask=how do I create an API token`, a goal like `automate deployments from our CI pipeline` lets GitBook tailor the answer to that use case.
The response will contain a direct answer to the question and relevant excerpts and sources from the documentation.
Use this mechanism when the answer is not explicitly present in the current page, you need clarification or additional context, or you want to retrieve related documentation sections.
 {% hint style="info" %}
**Estimated time:** Completing this deployment guide is expected to take approximately **2 hours**. This estimate may vary based on individual familiarity with the technology stack involved and the complexity of your organization's environment.
{% endhint %}
{% hint style="info" %}
This guide covers GCP, AWS, and Azure. Where steps differ by provider, choose your cloud provider in the tabs within that step — GitBook keeps the same provider selected across the rest of the page.
{% endhint %}
## Goals and scope of this article
The goal of this article is to guide system administrators through the complete deployment of CARTO Self-Hosted using a Single Virtual Machine in a cloud environment such as GCP, AWS, or Azure. The scope includes all necessary steps and requirements to prepare the environment, install and configure the CARTO platform, connect it to an external PostgreSQL metadata database, enable secure HTTPS access with a valid domain and SSL certificate, set up cloud storage integration, and verify the deployment through post-installation checks.
## Requirements
{% hint style="warning" %}
**Complete all prerequisites before starting.** Each item below links to its dedicated setup guide. Do not start the installation steps until every box is checked.
* [ ] **License & customer package** (including `license.yaml`) received from CARTO Support → [License / Customer Package](/carto-self-hosted/planning/prerequisites/license.md)
* [ ] **Virtual machine** provisioned and meets the hardware requirements for Single VM deployments → [Hardware & Software Requirements](/carto-self-hosted/planning/prerequisites/hardware-requirements.md)
* [ ] **Metadata database** (PostgreSQL 14+) provisioned and accessible from the VM → [Metadata Database prerequisites](/carto-self-hosted/planning/prerequisites/metadata-database.md)
* [ ] **Object storage buckets** created, CORS configured, and permissions set → [Object Storage prerequisites](/carto-self-hosted/planning/prerequisites/object-storage.md)
* [ ] **Network egress** open for all required CARTO services → [Network egress requirements](/carto-self-hosted/planning/prerequisites/network/egress.md)
{% endhint %}
To deploy CARTO Self-Hosted based on a Single VM deployment, you need:
* Access to the CARTO Self-Hosted installation package, including your license file. If you haven’t received it, you can request it by contacting
{% hint style="info" %}
**Estimated time:** Completing this deployment guide is expected to take approximately **2 hours**. This estimate may vary based on individual familiarity with the technology stack involved and the complexity of your organization's environment.
{% endhint %}
{% hint style="info" %}
This guide covers GCP, AWS, and Azure. Where steps differ by provider, choose your cloud provider in the tabs within that step — GitBook keeps the same provider selected across the rest of the page.
{% endhint %}
## Goals and scope of this article
The goal of this article is to guide system administrators through the complete deployment of CARTO Self-Hosted using a Single Virtual Machine in a cloud environment such as GCP, AWS, or Azure. The scope includes all necessary steps and requirements to prepare the environment, install and configure the CARTO platform, connect it to an external PostgreSQL metadata database, enable secure HTTPS access with a valid domain and SSL certificate, set up cloud storage integration, and verify the deployment through post-installation checks.
## Requirements
{% hint style="warning" %}
**Complete all prerequisites before starting.** Each item below links to its dedicated setup guide. Do not start the installation steps until every box is checked.
* [ ] **License & customer package** (including `license.yaml`) received from CARTO Support → [License / Customer Package](/carto-self-hosted/planning/prerequisites/license.md)
* [ ] **Virtual machine** provisioned and meets the hardware requirements for Single VM deployments → [Hardware & Software Requirements](/carto-self-hosted/planning/prerequisites/hardware-requirements.md)
* [ ] **Metadata database** (PostgreSQL 14+) provisioned and accessible from the VM → [Metadata Database prerequisites](/carto-self-hosted/planning/prerequisites/metadata-database.md)
* [ ] **Object storage buckets** created, CORS configured, and permissions set → [Object Storage prerequisites](/carto-self-hosted/planning/prerequisites/object-storage.md)
* [ ] **Network egress** open for all required CARTO services → [Network egress requirements](/carto-self-hosted/planning/prerequisites/network/egress.md)
{% endhint %}
To deploy CARTO Self-Hosted based on a Single VM deployment, you need:
* Access to the CARTO Self-Hosted installation package, including your license file. If you haven’t received it, you can request it by contacting